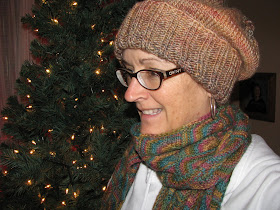
 I wanted to make a hat that holds snuggly around my head like a headband, but has a slouchy top, so that my hair is not squished. This is an easy pattern, and you can make it with any yarn that knits on 5mm needles and knits to gauge.
Yarn: Cascade Yarns, Lana Bambu: one skein (100grams, 196 yards.) Colour 3 (tan mix)
Needles: 5mm, (US 8)
Gauge: 16 sts = 4 inches in stocking stitch (knit row one, purl row two)
* note: I knit this flat, but you could knit in the round and change from circular needles to double points at the decreases near the top*
Pattern: Cast on 90 stitches. Work in K2/P2 ribbing for 7 inches.
Next row: Increase 18 stitches like this... [Knit 4, knit in the front and back of the next stitch] repeat in the brackets across the whole row (right side).
Next row...Wrong side: purl across 108 stitches. Right side: Knit across all stitches.
Repeat this stocking stitch pattern for 4 inches ending with right side facing.
First decrease row: Knit 21, [place marker, knit 2 together, knit 19 more] repeat the bracket 3 more times, then knit last 3 stitches.
2nd row : Purl wrong side row, slipping markers.
3rd row: [Knit to marker, slip marker, knit 2 together], repeat four times, then knit to end.
Repeat 2nd and 3rd rows 4 more times.
Purl next row.
 Final gatherings; Row one: [Knit 2 stitches, knit 2 together], repeating until all are worked.
Row two: purl across. Repeat row one and two twice more.... cut yarn to 24 inches. Thread end onto a darning needle and draw needle through all the remaining stitches, pulling it snuggly closed, then proceed to sew down the back seam all the way to the cast on ribbed edge. Turn big ribbed edge up in half to make it thicker and warmer and perfect!.
 Stay warm!
What a great looking hat! Found you on Ravelry.
ReplyDeleteI love this hat! Blessings,
ReplyDeleteHannah
I like the scarf in the picture... which pattern is this? I'd like to make it. Thanks...
ReplyDeleteThe scarf is knit by me, but not my pattern. The yarn is a short striping superwash, knit in a domino knitting style. Google domino knitting, buy self striping yarn, and you got it!
ReplyDeleteChris
Just what I was looking for in a hat pattern. Thanks so much for sharing.
ReplyDeleteHello Chris, my wife is n the process of making this lovely hat, however, she is unsure what "slip marker" in the line below means,
ReplyDelete3rd row: [Knit to marker, slip marker, knit 2 together], repeat four times, then knit to end.
Can you please explain.
Thank you
George for Vanessa
You have placed markers around the hat to help with the decreases. When you arrive at one you slip it from the left needle onto the right needle so that you can knit the next stitch. This ensures that the market stays in the same position as the hat hoes through all the decrease rows.
ReplyDeleteHope that helps. Chris
Vanessa, says got it thank you. I have no idea what both of you are talking about.
ReplyDeleteBut thank you very much, I'll go back to my workshop and man tools. George
George, you are so funny!
ReplyDeleteLol