Thursday, November 12, 2015

Emmett's Sweater Vest


 This pattern is for a baby "grandpa vest", and is sized to fit 3 - 6 months, 9 - 12 months, and 18 months.  It could be perfect to use up some leftover DK weight.  Please use the swatch / gauge test to assure a perfect baby fit! 


Emmett’s Sweater Vest
Sizes: Small (3-6 months), Med (9-12 months), large (18 months)
Yarn:   150 grams of light worsted weight (DK weight or Sport weight) *** check recommended needles and estimated gauge.  Work a swatch and recheck gauge after washing!!!

Gauge :  17 sts = 4 inches after washing.
Needles:    4mm  for body,   3.75mm for ribbing , 3.75mm circular for bands.
4 buttons, ¾ - 1 inch

Back
With 3.75mm needles, cast on 37 [39 ,43] sts
Establish rib pat on Row 1: *K1 , P1.
Repeat from *. End K1.
Row 2: P1, K1 across, ending with P1.
Work 5 rows. On row 6, increase 5 [6, 6] sts across the row.  42 [45, 49] now on needles.

With 4.0mm needles, work in stocking stitch until piece measures  5 [6, 6.5] inches.
Underarm Shaping:  Bind off 4 sts at beg of next 2 rws.
Continue in stocking stitch until piece measures  9" [1.5, 11.5] inches.
Bind off all stitches.

Front Left Side:
With smaller needles, cast on 19 [20, 22] sts.
Work rib pattern for  5 rws [1"]. On row 6, inc 2 sts across the row.  21 [ 22, 24] stitches now on the needle.
Change to 4.0mm needles, and work in Stocking Stitch until 5[6,6.5] inches are worked.
With right side facing: bind off 4 stitches for the armhole edge.  Then start the neck shaping like this: at the end of the armhole shaping row, knit the LAST two stitches together.  Continue in Stocking Stitch, decreasing at the last 2 stitches on every right side row only (every 2nd row) until 9[10,11] stitches are left. Continue without decreasing until total length is 9[10.5, 11.5] inches.  Bind off all stitches.

Front Right Side:
With smaller needles, cast on 19 [20, 22] sts.
Work rib pattern for  5 rws [1"]. On row 6, inc 2 sts across the row.  21 [ 22, 24] stitches now on the needle.
Change to 4.0mm needles, and work in Stocking Stitch until 5[6,6.5] inches are worked.
With wrong side facing: bind off 4 stitches for the armhole edge. Purl to end of this row.  Then start the neck shaping like this: on the NEXT row: knit the first two stitches together.  Continue in Stocking Stitch, decreasing at the frist 2 stitches on every right side row only (every 2nd row) until 9[10,11] stitches are left. Continue without decreasing until total length is 9[10.5, 11.5] inches.  Bind off all stitches.
Weave in all ends.
Seam each shoulder.
 
Armhole Edging:
With 3.75mm needles, pick up 38 [42, 46] stitches around armhole edge. Work in 1 by 1 ribbing for three rows, cast off loosely in ribbing on fourth row.

Finishing Band:
With 3.75 long circular needle and
RS facing, begin at lower right front
edge. Pick up 20 [24, 28] stitches to first neck dec, pick up 17 [17,  18] sts along theangled neck edge, pick up 18 [18, 20]sts along the back of the neck, pick up 17 [17, 18] sts down along the angled neck edge, pick up 20 [24, 28] sts to the end of the left side. Work one row in 1 by 1 ribbing.  Next row: (button hole row- you will make four button holes)   ….   keeping in the ribbing pattern:   Work 2 [3, 4] stitches, Yarn over, knit 2 together,  work 4 [5, 6] stitches, Yarn over, knit 2 together , work 4 [5, 6] Yarn over, knit 2 together, work 4 [5, 6] stitches, Yarn over, knit 2 together. Work the rest of the row in ribbing.
Next row, work ribbing, working the yarn overs back into the ribbing pattern.
Work one more row of ribbing, then cast off next row in rib stitch (loosely).
Weave in ends, and sew side seam.  Sew buttons opposite holes.

Pockets:  (optional)
With 4mm needles,  Cast on 11  [11, 13] stitches.  Work in stocking stitch for 2 [2, 2.5] inches.  Change to 3.75 mm needles and 1 by 1 ribbing, rib for 1 inch and cast off loosely all stitches.

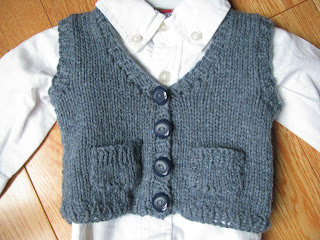
Sew pockets as shown in photo.

 Close up (sorry it's blurry) of the buttons and pocket.
Friday, September 11, 2015

Denim Blanket Coat


Denim Blanket Coat

This loose fitting blanket style coat is my first pattern involving STEEKS.  I (probably like you) was afraid of steeks, what with all the cut ends to finish off somehow.  It seemed like it would all unravel as I attempted to negotiate those cut rows!  This time though, the unraveled ends seemed perfect for the blanket fringe I had in mind, so I gave it a go.  I love the results, and although it was a bit of work to make the fringe, I did it in a way that was totally manageable, and will try to walk you through in words and photos.
This is NOT a beginner pattern.


Yarn: DK weight that knits to gauge**** please knit a swatch and block and measure!  Approximately 500 grams or 1200 yards.  (I used a mill end cone of merino tape, so exact yarn will not be available)
Needles: 24” circular needles, 4mm or whatever hits the gauge.
 2 stitch markers.  Long stitch holder or spare circular needle to hold stitches not being used.
Fringe twister (optional, you could hand braid the fringe) 
Gauge:  17 stitches = 4 inches in stocking stitch (after blocking) on 4mm needles.  I knit loosely so you may need 4.5 or 5mm to get my gauge.
Sizes:  Small (fits 32-36”bust),[ Med/Large (fits 38 – 42”),  XL (fits 44 – 48”)]

The body of this coat is worked in the round until armholes, then the back and front are worked separately.  “Steeks” are then cut and unraveled to create a front opening, and a fringe.

Body:  With circular needles, cast on 12, place marker, cast on 170[188,210], place marker, cast on 12.  Carefully join without twisting, and begin pattern:
Knit 12, slip marker, seed stitch 170[188,210], slip marker, knit 12.
Repeat this row until 1.5 inches of seed stitch are done. 
Change to body pattern:   Row 1, 2, and 3, knit every stitch.
Row 4, 5, and 6: knit the 24 steeks stitches (the short section between the markers) and purl the 170[188,210] body section stitches.
Repeat rows 1 through 6 for the horizontal rib pattern.
Work until length from the beginning is 17”[18”, 19”], or length you want to the underarm.

Divide your front from the back like this:    Beginning at first marker (continuing the ribbing pattern), work  45[50,56 ] cast off 6 stitches,  work in pattern next  68[76, 86] stitches, cast off next 6 stitches *place last 68 [76,86 ] stitches on stitch holder or spare circular needles.  Work in pattern until last stitch marker.  
Now you will work  the ribbing pattern and maintaining the steek (24 stitches between the markers) without joining the circular needles ….
You are working from underarm to underarm and the steek stitches are in the MIDDLE of the front.

Continue ribbing pattern and the steek stitches are now stocking stitch (knit the right side, purl the wrong side)  Until you have 9[9, 10] inches from the underarm split.  Next row: Cast off loosely until first marker, remove marker and work to end of row.  Next row: cast off loosely until last marker:  You now have only the 24 stitches between the marker “live”.    Do not cast these off!  Place these on a stitch holder, and place back stitches (from holder ) back on circular needle.
Work these stitches in the ribbing pattern until you have 9[9,10] inches done.  Cast off all stitches loosely.

Sleeves:
Cast on 34[38,42] stitches.  Work in seed stitch for 1.5 inches.  Change to stocking stitch and work for 3 inches, INCREASING one stitch each end every four rows.  At 3 inches, work three repeats of the 6 horizontal ribbing pattern.  Return to stocking stitch for the rest of the sleeve.  Always increase every four rows until you have 76[78, 82] stitches, then continue without increasing until you have 17 inches from the start (or length you would like for the sleeve to the underarm).
Cast off 5 stitches at the start of next two rows.
Cast off 6 stitches at the start of next two rows.
Cast off 8 stitches at the start of next two rows.
Cast off all the rest of the stitches.

Steek Cutting: (photos below)  carefully, find the center of the 24 steek stitches, and cut between the stitches all the way down the front.  Do not unravel yet.
Starting at one end.  Pull out two threads and using the fringe twister, create a twisted fringe and tie a knot to hold it.  OR if you do not have a fringe too, you can pull three threads and braid them to the end, tying a knot there to hold it.
Work all the way down one side and up the other.  Watch that you do not pull too hard, you want the edge of the body to lie nice and flat.  Take your time.  It will be beautiful when done.  The cast on row can be a bit tricky but unravel it too.  Braid four strands at the end if there is one left alone.
Once the fringing is done, you can sew a 4 inch shoulder seam, starting at the armhole.
Sew your sleeve seam.
Pin the sleeve evenly into the armhole and sew in place.
Gently wash and block your new coat!


 Fringe twister tool:


Monday, May 25, 2015

Thirty Minute Fur Wrap


It started with an amazing sale at Michael's Canada.  $1.99 for a 100gram skein of Premier Yarns Starbella Arctic.  I scooped up 7 skeins, and decided to use it to "arm knit" a thick wrap.  How to arm knit:  check out this or other youtube videos

 Yarn:  Starbella Arctic, or other furry or fuzzy super bulky yarn.  Artic is actually a thick ruffle style yarn, but looks great when arm knitted.
Gauge - unimportant.

"Cast on" 10 stitches, and arm knit until last skein is 2/3 done (I was getting about 1/3 skein per row).  Cast off.
Use a shawl pin to hold the wrap closed! 
This took me 30 minutes to knit and cost $14!
 Beautiful!  The edge of netting, usually used to knit through gives a nice texture to the fur stitches.


Sunday, May 24, 2015

Panoply Conference

My nuno felt workshop took a road trip to Burlington, Ontario, where the Ontario Spinners and Weavers were hosting a three day conference.  They wanted a few other techniques for their members to try, and invited me to do a half day scarf workshop!
Here is half my gear rolling into the room.

Here we see one of the eight students, laying out the beautiful fibres onto the bed of silk chiffon.
 Another layout in amazing colours.
 Busy learning the joys of nuno felting!
 They even tackled the hard physical work with humour and grace.  I attempted to entertain with stories of large and unexpected felting successes.
 And after three hours each of them had a unique and completed scarf to wear home (although they were a bit damp).
 They are much more impressive in person, as the photos do not show all the textural details that you would see, and the way they float around when worn.
 Later in the evening, there was a fashion show, and a few of my pieces found their way in!  Here, a model really shows off the volume and the float of the soft nuno felt coat.
 A model in the black and red vest.
 Also very warm in the burgundy winter coat.
 And the finale of the show, my butterfly coat, worn by a delightful gentleman, who swooped around like batman and showed how big and dramatic this piece can be!
 Movement!
I had such fun with this group, and everything was well organized, with enthusiastic attendees, and energetic volunteers.  I thank them all for the opportunity to be involved.

Tuesday, April 28, 2015

The Butterfly Project

It starts with sheer silk chiffon in white, dyed a beautiful orange.

Then the sketches, and measurements.
Here is the bodice layout.  Fine black merino, orange merino and silks.
The black "scarf" that becomes the draping neckline.
Four pieces of wings, and more black for the back.
Measurements dialed into the dressmakers dummy....
and the final results, a lovely monarch has emerged.

It moves like air.  Stunning!

Monday, April 27, 2015

Art Gallery Installation


My Puesta de Sol (sunset in spanish) wet nuno felt art piece is now hanging in the Art Gallery of Burlington (Ontario).  It will be part of the Panorama of the Americas exhibit in the Community Gallery until May 24.  Please visit the gallery if you are near Burlington.  It is the first time I have been there, and it is a huge and varied gallery with some amazing art of all mediums!
 My entry won an award that will be presented at the Panoply - a Pan American Celebration of our Fibre Craft Heritage conference May 22 - 24, where I will also be teaching a workshop for nuno felt scarves.  The workshop is full, but I made some wonderful new friends at the gallery, and will be organizing several new workshops in the near future.
 My fish in the room of weaving and knitting and tapestry.
You can walk all around Puesta de Sol, and see all the details.

Wednesday, April 15, 2015

Amazing Experience


Pamela's, my lovely shop in Jordan Village, was featured in a local fashion show, raising funds for local women's charities.  The host for the fashion show was the wonderful Lynn Spence (fashion expert from Cityline).  She is as amazing in person as she is on TV.   Lynn came to all the shops personally to choose the fashions that were featured, and when she was in Pamela's she saw my  nuno-felt coats.  She chose two to be toppers over outfits, and asked me if I had a light colour one for her to wear as she hosted the event!
I was honoured with the request, and brought the rose-grey (the one from my etsy site).  She wore it over a black dress, and you can see how great it looked on Lynn!
 Backstage in the prep area.
 Lynn with me backstage.  What a wonderful, inspiring lady.  Thank you Lynn.
The coat is still available on etsy if you would like a "famous" piece of nuno-felt wearable art!  (upper right corner of the blog).     Sorry this one is now SOLD!  Custom order one in YOUR favourite colours!

Thursday, March 26, 2015

More Colours available on Etsy for the Home Workshops!


Here are two more colours of home workshop scarves available on Etsy.....
Hit on the link at the top right (the butterfly coat) to jump into my etsy site.
The workshop kit includes everything you need to complete the scarf, except water, towels, dishsoap, and a dryer.  All instructions in a 21 page colour photo booklet are included, and I am only an email away for help....   Dare yourself to learn this amazing craft!


Black, brown, and now purple kits are in stock.  More to come, or just email me with a colour you like.  I am sure I can build a kit for you.   :)

Monday, March 23, 2015

New! Workshop KIT for sale on Etsy


I have fielded many emails asking for a tutorial or workshop or instruction kit to make my nuno felt scarves, since most of you do not live near enough to attend my workshops in person.  So after much compiling of photos and instructions I came up with this.  A kit to complete a scarf, start to finish, no experience necessary.  After teaching so many students this technique, I think I have answered all the questions, and have enough photos, that it will be like I am standing over your shoulder! 
The other thing about this tutorial, material kit, is that all YOU will need are things already in your home!  Towels, water, dish soap, and a Dryer (must have a NO HEAT setting).
Here is the kit.  It includes 21 pages of instruction and photos. A base of chiffon silk, sourced from vintage saris.  Merino roving in main and contrast colours, contrast silk fabric with some beading already on it for embellishment, and some various fibres and yarns that finish the details.  Also plastic sheeting, poly sheer fabric, a water bottle with holes already drilled, and some ties to roll up your work.
 Below are (left to right) the bottle and plastic wrap, chiffon silk, merino rovings, embellished silk and fibres. 

 You will end up with a 5 foot by 15 inch nuno felt scarf, like this one.
 Here is a view of the details, front and back.
To get your own workshop, hop over to my Etsy site (upper right of blog), and choose a colour family that suits you.  I have the brown and wine up right now, and will add several other colours over the next few days.
Happy felting!

Monday, March 2, 2015

Beaded Mohair Shawl


 A wonderful find on my September trip to Nova Scotia is this Hand Maiden duo of fine lace weight mohair and sport weight silk boucle, hand dyed into a lovely burgundy mix.  I wanted to make it even more special by adding the sparkle of glass beads.  Starting at the top center, the pattern allows you to get a handle on the beading with short rows to start, ending with the marathon rows along two sides of the triangle.  By then you will be an expert!  This pattern is not for beginners, and you should have some experience with increases in the yarn over, but could be new to beading, with the photos below lending a hand.


Beaded Mohair Shawl

Yarn:  I skein HandMaiden Rumple (100% silk boucle) 100 grams/ 300 meters
     1 skein Hand Maiden Angel Hair (70% kid mohair, 30% nylon) 50 grams 400 meters
Needles: 3.5 mm circular needle (to allow for the width of the shawl – not worked in the round)
Glass beads 6/0 size, about 100 grams
Tiny crochet hook US 11/12  1.0 mm
Stitch marker

Gauge: not too important, but 14 - 16 sts = 4 inches  
Size of mine:  60 inches across the longest edge, 27 inches deep.  But you can keep knitting and grow it bigger if you choose.

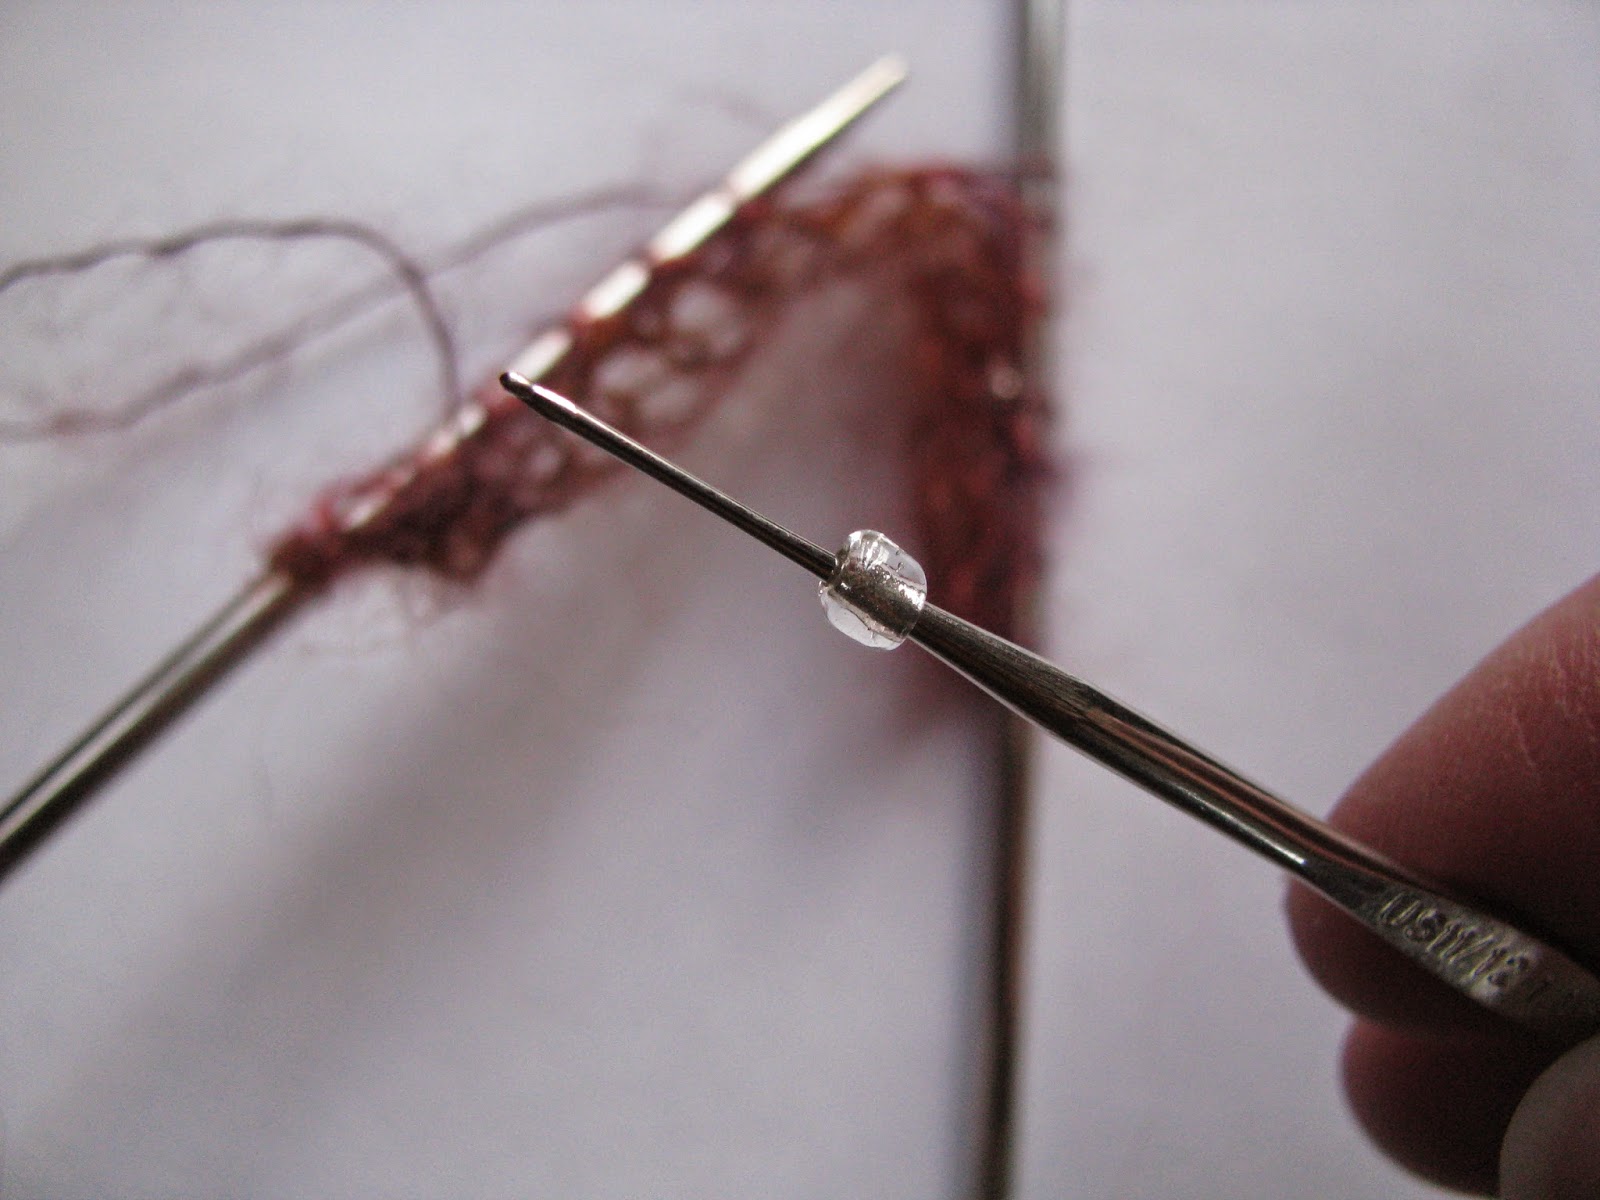
How to :  PLACE A BEAD:   With tiny crochet hook, pick up a glass bead, then attach the crochet hook to the next stitch on the knitting needle.  Pull it off the knitting needle, and slip the bead off the crochet hook and onto the mohair stitch, then with the crochet hook, feed the loop of the stitch BACK ONTO the knitting needle….. see photos:


Shawl pattern:
Starting at the center, with silk boucle, cast on 5 stitches.
K1, YO, k1, YO, place marker, k1, YO, k1, YO, k1
Wrong side row:  k all stitches, slipping the marker
Regular right side row:   K1, YO, knit to marker, YO, slip marker, YO, knit to last stitch remaining, YO, k1.
Repeat wrong side row again,
Change to mohair yarn, and ***** work one regular right side row, and one wrong side row.
Bead Row:  K1, YO, K 2, [PLACE A BEAD, k bead stitch, k3]repeat across the row…. As you come to the marker, slip marker, YO, k1, YO at the same time as planting the bead every 4th stitch.  Move to the next stitch if the count places the bead at a yarn over. Continue to the last stitch at the end of row, placing the beads as you go.  Stop the last bead about 4 – 6 stitches before the end.  YO and k1 at the end of the row as usual. 
Wrong side row with mohair.
Work one more regular right side and wrong side.
[work another bead row, and wrong, right and wrong regular rows- 4 row pattern], then repeat the 4 row pattern again. Since ***** you have worked two rows plain, then three sets of the 4 row pattern, for 14 rows with the mohair and beads.
Change to silk boucle and work 4 regular rows (without beads): right side with the yarn overs, and wrong sides straight knitting.
Change to mohair and work the ***** 14 row pattern *****.
Continue to alternate the 4 row silk boucle and 14 row mohair bead pattern, until size of shawl desired, or 7 pattern repeats have been completed (like mine). 
Finish with 4 rows of silk boucle, and a very loose cast off of all stitches.