A wonderful find on my September trip to Nova Scotia is this Hand Maiden duo of fine lace weight mohair and sport weight silk boucle, hand dyed into a lovely burgundy mix. I wanted to make it even more special by adding the sparkle of glass beads. Starting at the top center, the pattern allows you to get a handle on the beading with short rows to start, ending with the marathon rows along two sides of the triangle. By then you will be an expert! This pattern is not for beginners, and you should have some experience with increases in the yarn over, but could be new to beading, with the photos below lending a hand.
Beaded Mohair Shawl
1 skein Hand
Maiden
Angel Hair (70% kid mohair, 30% nylon) 50 grams 400 meters
Needles: 3.5 mm circular needle (to allow for the width of
the shawl – not worked in the round)
Glass beads 6/0 size, about 100 grams
Tiny crochet hook US 11/12
1.0 mm
Stitch marker
Gauge: not too important, but 14 - 16 sts = 4 inches
Size of mine: 60 inches across the longest edge, 27 inches deep. But you can keep knitting and grow it bigger if you choose.
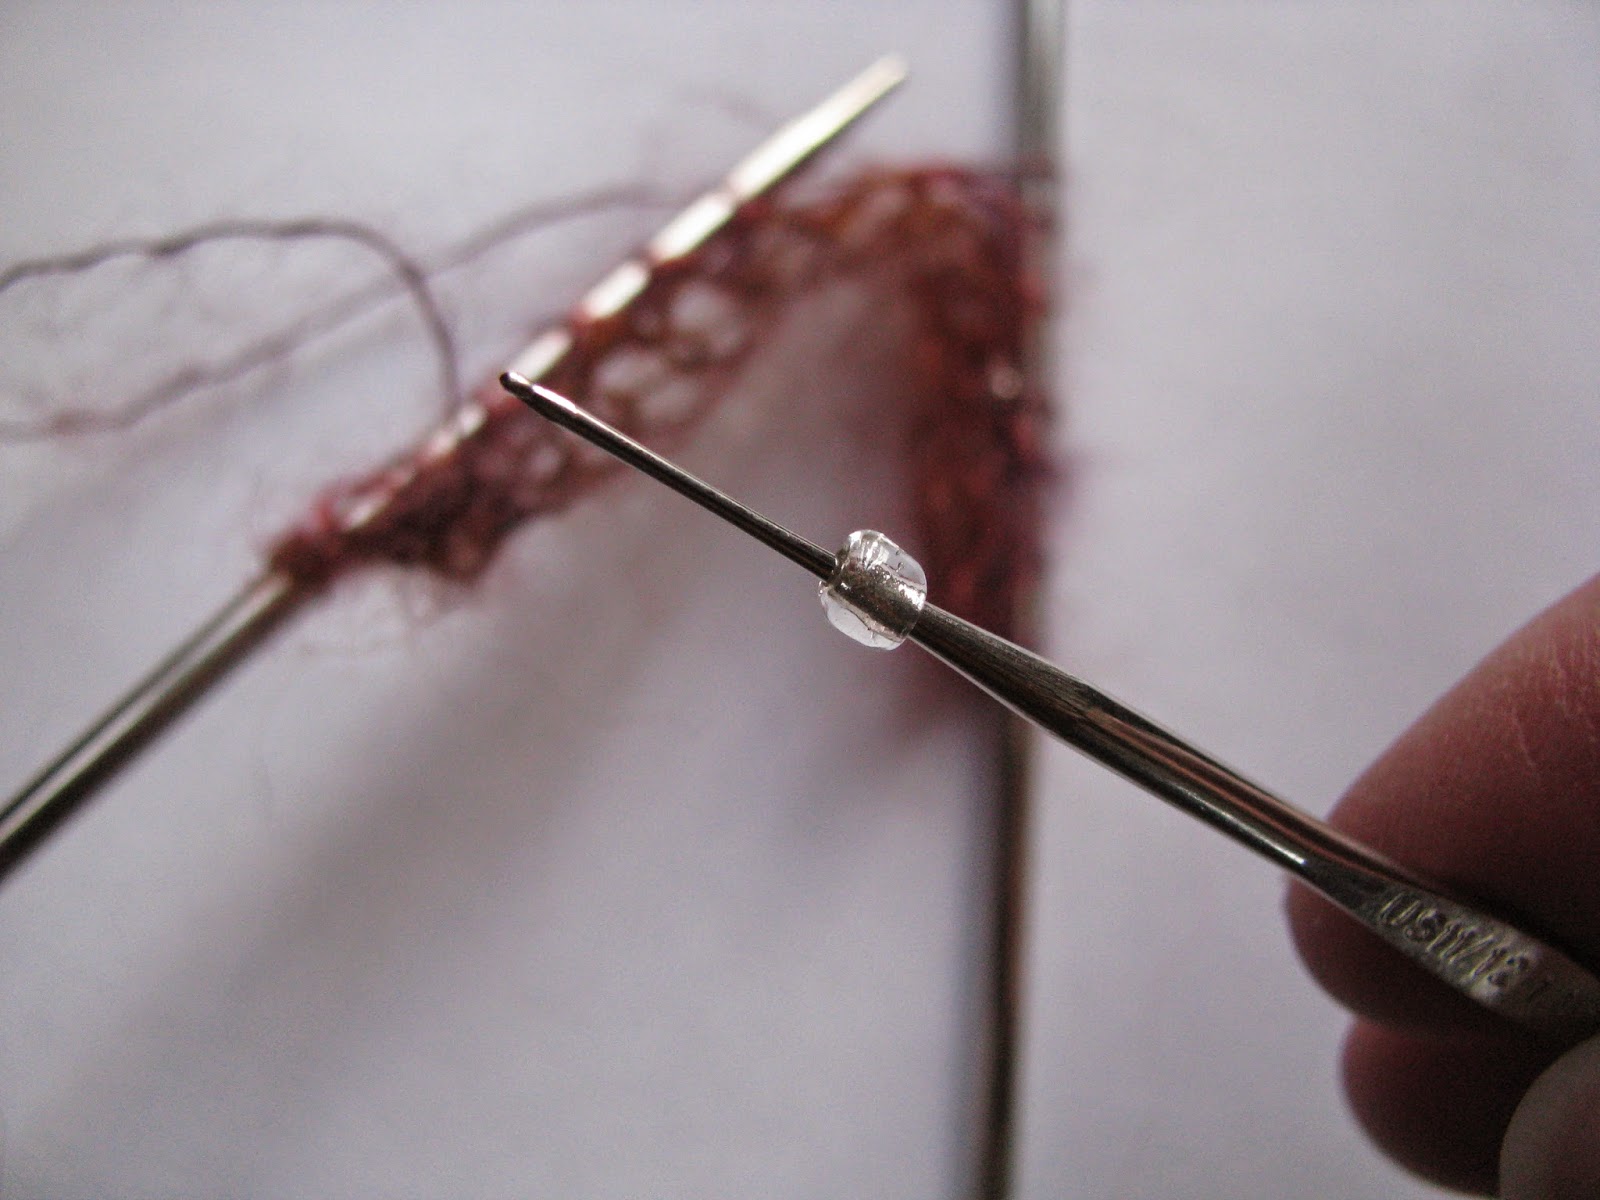
How to : PLACE A BEAD: With tiny crochet hook, pick up a glass bead,
then attach the crochet hook to the next stitch on the knitting needle. Pull it off the knitting needle, and slip the
bead off the crochet hook and onto the mohair stitch, then with the crochet
hook, feed the loop of the stitch BACK ONTO the knitting needle….. see photos:
Shawl pattern:
Starting at the center, with silk boucle, cast on 5 stitches.
K1, YO, k1, YO, place marker, k1, YO, k1, YO, k1
Wrong side row: k all
stitches, slipping the marker
Regular right side row:
K1, YO, knit to marker, YO, slip marker, YO, knit to last stitch
remaining, YO, k1.
Repeat wrong side row again,
Change to mohair yarn, and ***** work one regular right side
row, and one wrong side row.
Bead Row: K1, YO, K
2, [PLACE A BEAD, k
bead stitch, k3]repeat across the row…. As you come to the marker, slip marker,
YO, k1, YO at the same time as planting
the bead every 4th stitch.
Move to the next stitch if the count places the bead at a yarn over. Continue
to the last stitch at the end of row, placing the beads as you go. Stop the last bead about 4 – 6 stitches
before the end. YO and k1 at the end of
the row as usual.
Wrong side row with mohair.
Work one more regular right side and wrong side.
[work another bead row, and wrong, right and wrong regular
rows- 4 row pattern], then repeat the 4 row pattern again. Since ***** you have
worked two rows plain, then three sets of the 4 row pattern, for 14 rows with
the mohair and beads.
Change to silk boucle and work 4 regular rows (without
beads): right side with the yarn overs, and wrong sides straight knitting.
Change to mohair and work the ***** 14 row pattern *****.
Continue to alternate the 4 row silk boucle and 14 row
mohair bead pattern, until size of shawl desired, or 7 pattern repeats have
been completed (like mine).
Finish with 4 rows of silk boucle, and a very loose cast off
of all stitches.