Showing posts with label free pattern. Show all posts

Wednesday, October 5, 2011

Mohair Multi-Coat

This is a quick knit. You can use any bulky mohair that knits to gauge. This one is knit from four different colour-ways of Mode Mohair from Elann - mine was the self striping version now out of stock, but there are lots of the solid colours left at Elann! Just 8 skeins (50gms - 100 m).

Needles: 7mm (US 10.5)
Gauge: 11 sts = 4 inches.
Size: Large (chest = 48 inches, length = 30 inches)

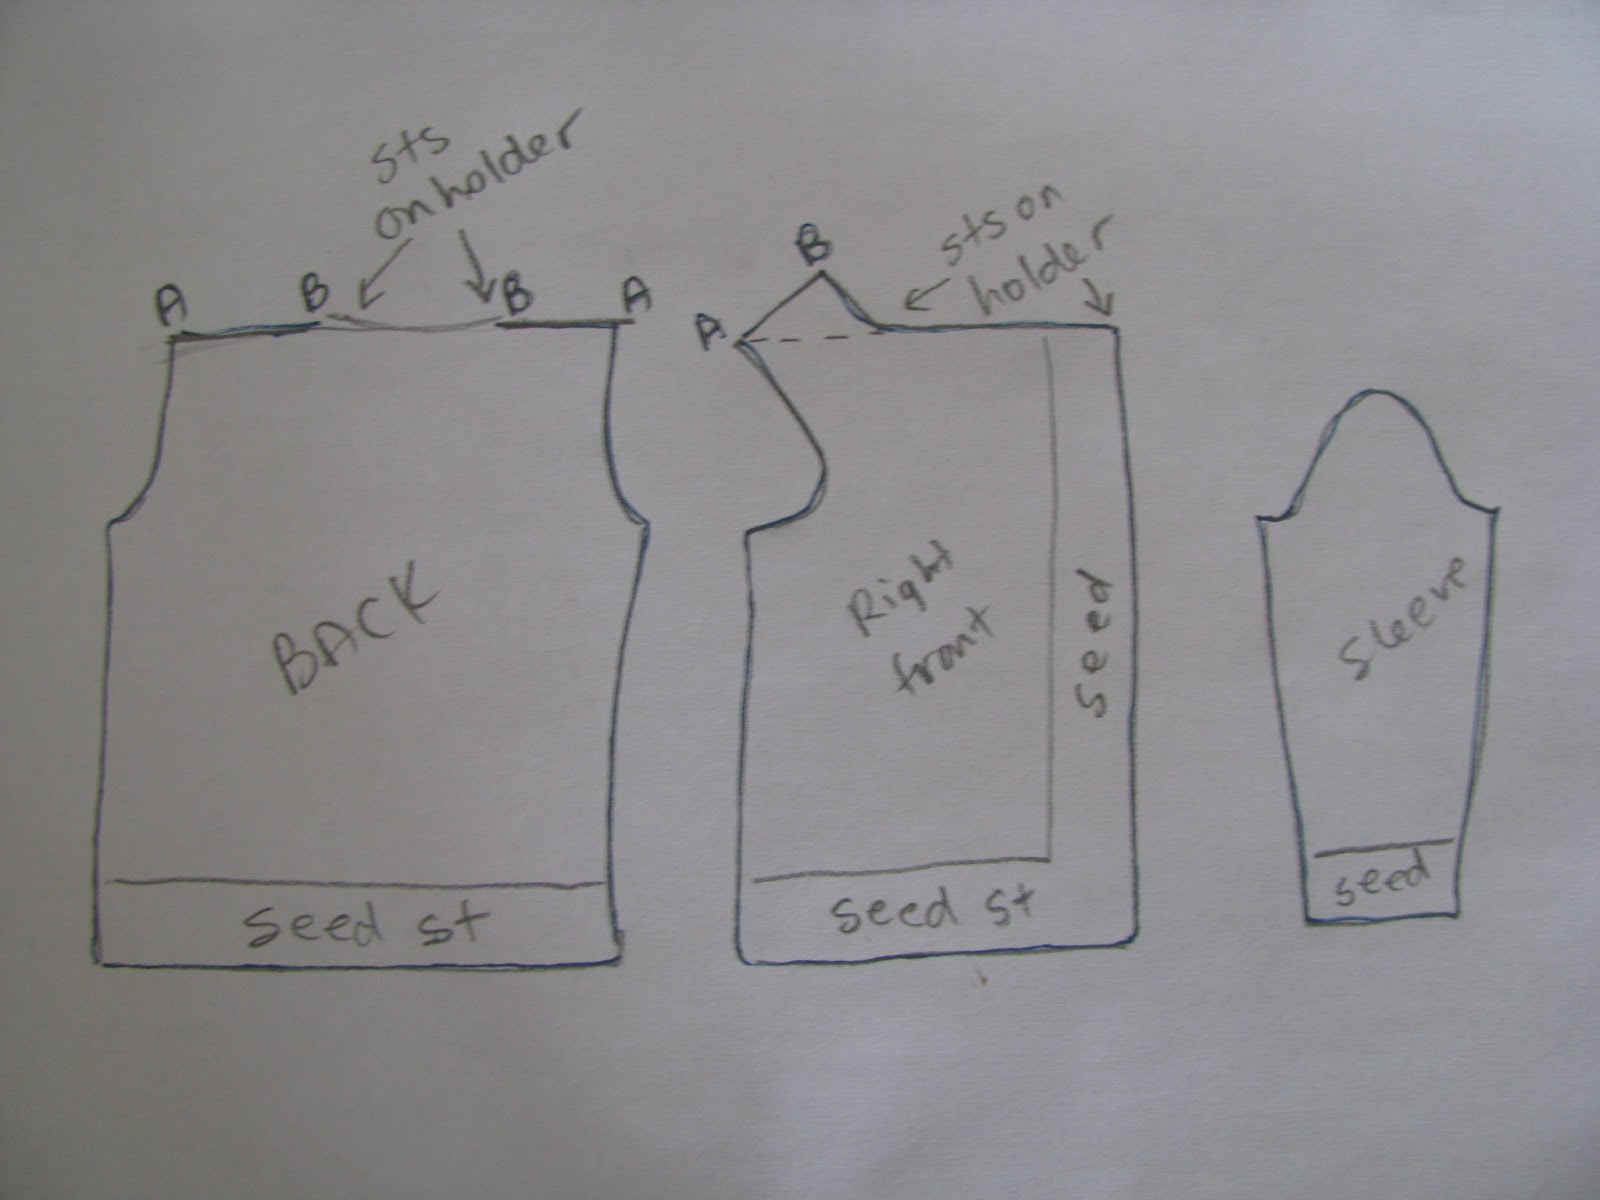
Back: cast on 60 sts, and work in seed stitch for 2 inches. Change to stocking stitch and work for 21 inches. Cast off 5 sts at start of next two rows. Continue even until armhole measures 9 inches, cast off all stitches.
Left Front: cast on 35 stitches. work seed stitch for 2 inches. With right side facing, work first 30 stitches in stocking stitch, and the last 5 stitches in seed stitch(front band). Continue to work up front with 5 stitches in seed at the front band, and the rest in stocking. Work such until 21 inches, cast off 5 stitches from the armhole side only. Work even again (keeping the seed stitch band) until 5 inches above the armhole. Cast off 8 sts (including seed band) at the center front neckline side only. Cast off 3 more at next neckline row, and one stitch FIVE more times. Work even until 30 inches from start and cast off all stitches.
Right Front: Make same as back (reversed shaping) BUT add button holes: At 3" in the 5 seed stitch band: work 1 stitch, knit 2 together , yarn over, knit 2 together, continue along the row. On the wrong side in the seed stitch band: seed stitch for one stitch, knit in the front and back of the yarn over, seed stitch the last two stitches. Continue to seed stitch the band.... placing another button hole 5 inches above the last one, repeated until 5 holes are spaced along the band.

Sleeves: cast on 30, work seed stitch for 2 inches, then stocking stitch for the rest: Increase one stitch every 6 rows until 48 stitches , then work even until 20 inches from start. Cast off all stitches. Make another!

Sew shoulders, pick up 60 around neckline and work seed stitch for 1.5 inches. Cast off loosely.
Sew sleeves into armhole space, and sew side and arm seams.
Mix your colours anyway you want or stitch it in one colour!

Spot the little blue bird in the photos! She loves mohair!

Friday, August 26, 2011

Merino Mohair V-Neck


If you have ever purchased hand dyed yarns, you will notice that they usually suggest using two skeins at a time and alternate skeins every two rows to create an even colour fabric. I picked up four skeins of Merino Angel when I was in Nova Scotia in June. The colours of the skeins were similar, but definitely different. This sweater uses two skeins at a time and decided to “colour block” them… Half of the front is one skein and the other half another, then when the blocks were approximately square, I switched the sides, and used the same skeins on the other half. I repeated once more before the piece was full length. The close up photo at the bottom shows the place where the colours change. It is subtle, but I like the effect and it is a much more even way of mixing odd colours.
Yarn: Fleece Artist Merino Angel
Needles: 4mm (US 6)
Gauge:17 sts and 24 rows = 4 inches
Finished size: 40 inches (designed to be a bit loose and oversized for me)
Pattern (optional) if you have hand dyed yarns, place a marker at the center of row, and use one ball of yarn on one side, then another for the other side, twisting the yarns around each other as you cross from one side to the other (intarsia). When each block is approx. square, change the side that each ball is used. Repeat when square again. If your yarn is one colour don’t do this, it won’t show anyway. You could also use solid and completely different colours for more dramatic effect!
Back: Cast on 81 sts, work in knit one, purl one ribbing for 5 rows, then increase 11 sts across the next row in ribbing.
Change to stocking stitch (knit right side, purl wrong side) and work even until 19 inches from the start.
Armhole: Cast off 4 sts at the start of next two rows. Continue even from there until piece measures 29 inches from the start. Cast off all stitches.
Front: Work same as back until armhole.
Armhole: Cast off 4 stitches at start of next two rows. Next row (divide for Vneck): Work 39 sts, join second ball of yarn, cast off 6 sts, work remaining 39 sts with second ball of yarn.
Continue to work upper fronts, decreasing one stitch at each neck edge every 4th row 15 times (working both sides at the same time with separate yarn balls.) Finish to 29 inches with no further decreases, then cast off both shoulders.
Sleeves: Cast on 45 sts, work ribbing for 6 rows, then in stocking stitch, increase one st at each side, very 4th row until 86 sts are on the needles. Continue even until 19 inches long, then cast off all stitches.
Sew shoulder seams.
Neck finish: with small circular needles, pick up approx.. 100 stitches around the neck edge starting at the bottom of the v **** leave the 6 cast off stitches at the bottom of the V untouched... Work up the left side of the V, across the back of the neck and down the right side. Turn and work back up the right side in K1,P1 ribbing (do not join and work around the circle!) Work total of 6 rows of ribbing, then cast off loosely in ribbing. Sew the ends of the ribbing down to the 6 cst off sts.
Sew the sleeves into the armhole opening. Then sew the sleeve and side seams.

enjoy

Monday, July 4, 2011

Colinette Art Cardigan


Yarn: Colinette Art, 5 skeins (100 grams - 173 meters)

Gauge: 17 sts and 26 rows = 4 inches in stocking stitch

Size: Roomy 44 inch chest.

Needles: 4.0mm (US 6) circular needles required for front bands so I use them for every piece.

Stocking stitch : right side Knit. Wrong side Purl.

Seed stitch: row 1: k1, p1 repeat across row. row2: knit the purls, purl the knits.

Back: Cast on 85 sts. Work in seed stitch for 2 inches. On last row increase 9 stitches evenly across the row. Change to stocking stitch, and work until 16 " from start.

Raglan shaping: Cast off 8 sts at the start of next two rows.

** decrease row**Knit 2, knit 2 together, knit to last 4 sts, knit 2 together, knit 2**

use decrease row every 2nd row 22 times. Then every 4th row 5 times.

Cast off remaining 24 sts.

Left Front: cast on 43 sts. Work in seed stitch for 2 inches, increasing 4 sts across the last row. Change to stocking stitch, and work even until 16 inches from start. Cast off 8 at the start of next right side row. (underarm side). Start decreases on that side only by the knit 2, knit2 together method every 2nd row for 22 repeats, then every 4th row, 5 times. ***ALSO at the same time decrease one stitch at the neck edge, every 6th row 11 times. (the neck edge decrease should be done by knit 2 together at the edge.) Continue both decrease edges, until 10 sts are left, and the piece should be about one inch shorter than the back. Cast off 10 sts.

Right side: same as left, but reverse the decrease shaping to mirror the left side.


Sleeves: Cast on 33 sts. Work in seed stitch for 3 inches. Increase 5 sts across the last row. Change to stocking stitch and shape the sleeve by increasing one stitch each end every 6th row 13 times (64 sts on needle). Work even until sleeve is 18 inches long (or chosen length to underarm).

Cap shaping: Cast off 8 sts each side. Then using the Decrease Row method, decrease one each side every 2nd row 10 times, then every 4th row 9 times. Right sleeve (right side facing) cast off 4 sts, knit to end. Purl next row. Cast off 4 sts. [left sleeve, (wrong side facing) cast off 4 sts, purl to end. knit next row, cast off 4 sts.]

Sew raglan seams. Bands: Pick up 120 sts on right side front (up to neck edge only) Work in seed stitch for front band, about 1.5 inches. Place button holes evenly spaced along the lower part of band only [I put three]. Cast off loosely. Do the same for the left side band, without buttonholes.


Collar. pick up 70 sts from the neck edge including the top of the front bands. Work in seed stitch for 4 inches, then do 5 rows of stocking stitch before casting off loosely. This last bit will roll into a nice edge for the collar.

Thursday, February 17, 2011

Kimmee's Sweater

Kimmee's Sweater!
This is the pattern for the sweater I made for my sister's birthday. Made with my favourite self striping yarn, in a loose, comfy, cowl neck design.
Size: 40 inch chest, 27 inch length from shoulder.
Yarn: Noro Furin (Cotton, silk, wool, rayon) 10 balls (50 grams, 110 m) (Noro Silk Garden would work to this gauge too)

Gauge: 18 stitches and 24 rows = 4 inches
Needles: 4.5mm for the main part, several circulars or double points for the cowl neck (see cowl below).
Back: Cast on 79 stitches, and work in knit one, purl one ribbing for 2 inches. On last wrong side row, increase 6 evenly across.
Change to stocking stitch (knit right side and purl wrong side), and work even until piece measures 17 inches from the start.
Cast off 5 stitches at the start of next 2 rows, then 1 more at the start of next 4 rows. (armhole shaping). Continue straight until total length is 27 inches. Cast off all stitches.
Front: Work the same as the back until front measures 23 inches. Shape neck: Work 28 stitches, add a second ball of yarn (I try to match the colour of the other side) cast off next 15 stitches, knit to end. Working both sides of the neckline, decrease one stitch at each NECKLINE edge every row 4 times, then only on the right side rows 4 times. Continue to work even until 27 inches total are done, cast off both shoulder edges.

Sleeves: Cast on 39 stitches, and work in K1, P1 ribbing for 2 inches, increasing 6 stitches in the last row of rib.
Work in stocking stitch, increase one stitch at each end of the row every 6th row. (until you have 84 stitches on the needle, then work without increases)
Work until total length of the sleeve is 18 inches.
Cap: cast off 15 stitches at the start of next four rows. Cast off all the rest of the stitches.


Cowl Neck options(please read both)
Straight needle instructions:
**** you could work the cowl on straight needles if you sew only ONE shoulder seam and leave a side seaming the cowl neck at the other shoulder. Pick up 76 stitches across the back and around the front and work back and forth instead of around like below. Every inch or so change to a large needle and work until 6 - 7 inches are done. Cast off VERY loosely. ********
Circular instructions: (my choice) sew both shoulder seams.
With double pointed needles (4mm) or short circulars (I used my Denise set, with the shortest length that could still turn to knit), pick up 76 stitches evenly from around the neck edge. Work in K1, P1 ribbing for the cowl neck. For every inch worked, you can change up a needle size (again easy with the Denise set, work your way from 4mm to 6.5mm) If you don't have that many, try 4mm for 2 inches, 5mm for 2 inches and 6mm for the rest. Work for at least 6 inches, but I did closer to 7 inches for really full cowl. Cast off VERY loosely (use a 7mm needle if that helps).
Sew in sleeve caps, then finish under arm and side seams.
Mail to your sister!

Thursday, December 23, 2010

Really Tweet Texting Mittens

With all the cell phones out in the fresh air these days, I am surprised I have not seen a pattern for these.... Mittens that will allow the user to text, tweet, twitter and well, make a phone call while keeping as many parts of the hands as possible under cover. Sure there are fingerless mittens, and hand warmers, but these expose just the essential tips of one finger and thumb on each hand! They are knit with sock yarn on small needles, and could be made in stripes with leftover sock yarns!

Yarn: standard sock yarn, about 75 grams.
Needles: 2.25mm (US 1) double pointed set of 4
Markers: one for start of row, and two different ones for thumb increases.
Stitch holders (you could use a darning needle and pass contrasting yarn through the stitches to hold them)
Gauge: 28 sts = 4 inches in 3 X 1 ribbing pattern.

3 X 1 ribbing pattern: [Knit 3, Purl1] repeat

Size: to fit ladies or teens hands. Watch length of open finger and thumb and adjust for shorter fingers... you want to leave exposed from the final knuckle.

Right Hand: Cast on 52. Divide onto 3 needles and join carefully, begin cuff pattern: [Knit2, Purl2]repeat. Place a marker to show start of row. Working in 2 x 2 ribbing, continue until 4 inches are done, moving start of row marker with each new row.

Change to 3 x 1 ribbing pattern, and work that for 1 inch.

At start of new row: work 2 stitches, place 2nd marker, knit in the front and back and front again in the next stitch, place 3rd marker, and continue in 3 x 1 ribbing as established for the rest of the row.

*for next 2 rows, knit the knits and purl the purls, making the stitches between the 2nd and 3rd markers (the thumb markers) all knit stitches.

Increase thumb row: knit 2, move marker, knit in front and back of next stitch, knit to last stitch before end of thumb marker and knit in front and back of that stitch, move marker, and work the rest of row as established.**

Repeat between * and ** until there are 13 stitches between the thumb markers.
Work 2 more rows as established.
Nest row: Knit 2, place next 13 stitches onto a holder, and remove the thumb markers, then cast one stitch on needle, and continue to work the 3 x 1 ribbing from the other side of the thumb, pulling the gap closed and letting the thumb stitches hold in front of your mitten.

Work the 3 x 1 ribbing for the rest of the hand for about 1.5 inches or until the palm of hand in completely covered (you can try it on as you go to check!).

You should still have a start of row marker that is moving up with you, so starting there make the index finger as follows: place next 7 stitches on a needle, place next 38 on a holder, and place last 7 stitches on a needle. (you have not knit any stitches while doing this)

At start of row: knit 7 from first needle, cast on two more and split these 9 more evenly onto two needles, then join the circle by knitting a third needle from the last 7 stitches. You have a small closed circle of 16 stitches. Work around this in all knit stitches for 1.75 inches or desired length for the index finger, then cast all off loosely. Leave a 5 inch end to weave in later.

Put the 38 stitches from a holder onto needles like this.... first 20 on the first needle, next 10 on second, then 8 on third needle. As you knit around these from the start, end with casting on 2 more stitches on the last needle, then join in a circle and knit the rest of the mitten top.

Work even for one inch. Decrease row: Knit 2 together at start AND end of needle 1, and knit 2 together at start only of needle 2 and end only of needle 3 (Decreases are on the outside edges of the mitten only - like a sock toe).... Now here is the tricky part. You will continue to decrease stitches at the end of needle 1 and start of needle 2 every other row (more tapered on the pinky finger side) BUT will only decrease every SIXTH row on the middle finger side.... you can do it, it's only for a couple of inches! When the whole mitten top is about 3 inches long and you have about 16 stitches left you can stop and use a weaving (kitchener stitch) to close the top like a sock...
Thumb: Place 13 stitches from holder onto 2 needles, attach yarn and knit across them both, then with a third needles, pick up 5 stitches evenly from the top side of the thumb hole. Join and work evenly for 1.5 inches for thumb, then bind of loosely all stitches.

Left Mitten: Cast on 52 and work the same as right, placing start of row marker, work until 1 inch of 3 x 1 ribbing is done.
Placement of thumb markers: Work around the mitten until 3 stitches remain BEFORE start of row marker: place thumb marker, knit in front and back and front again of next stitch, place second thumb marker.

Continue to work in the same manner as right mitten until 13 sts on the thumb, and place on holder as before. Cast one more on the needle over the thumb and continue to work the same way as the right mitten right through to the finish. Pick up and work the thumb the same.

Tuesday, December 21, 2010

Funky Chunky Teapot Cozy

This pattern should fit most 4 - 6 cup teapots. It stretches easily and hugs almost any shape of pot.
Yarn: Wool-Ease thick and quick (less than one ball)
Needles: 9mm (US 13) Straight needles are ok, but you need double points for the I-cord detail.

Cast on 40 stitches. work in K2 P2 ribbing for 3 inches.
Work 18 stitches, cast off 4 stitches and rib to end of row. Working on one half only (put other 18 on a holder) work in ribbing until top edge of teapot (about 3 - 4 inches). Put those 18 on a holder and rejoin the other side and work second side to the same length as first side.
Now join sides again by ribbing from one side right across other side (36 stitches on the needle now). Work 4 more rows of 2 by 2 ribbing. Next row, [K2, Purl 2 together] repeat across the row. Work 4 more rows in K2, purl ONE ribbing (as established).
Finishing: Cast off 2 stitches, knit 3 and put last 4 stitches on a holder, cast off 4 stitches, knit 3 and put last 4 stitches on a holder. Cast off 4 stitches, knit 3, and put last 4 stitches on a holder... then cast off all the rest. This leaves only 12 stitches divided on 3 holders to make the three I-cord details. With double pointed needles, knit 4 stitch I-cords on all the remaining stitches, working about 4 inches, or until it's the perfect length for you.

Stitch back seam for about 2 inches to sit below the handle of the teapot, leave an opening for the handle and stitch again above the handle. Stitch the top of the pot, leaving the I-cords dangling freely.
Now put the kettle on and put your feet up!

Saturday, November 27, 2010

Noro Beret (felted Tam)

This hat is lightly felted to make the fabric fuzzier and a bit thicker. I like the self striping design, and every hat will be different!

Yarn: Noro Silk Garden, 2 balls
Needles: 4.5mm ( US 7) double pointed needles, and short circular needles (also 4.5mm).

Starting at the center top of the hat, using the double point needles, cast on 4 sts. Round 1: knit into the front and back of each stitch. (8 sts). Place markers between each of the eight stitches * making the end of row marker different from the rest*. Round 2: Knit front and back of each stitch (24 sts)
Round 3: [Knit front and back of next stitch, knit one] repeat to end of round.
Round 4: Knit every stitch.
Round 5: [Knit front and back of next stitch, knit to marker] repeat to end of round.

Continue with round 4 & 5 increasing every other row, until work measures about 11 inches in diameter. (switch to circular needle when double points get too full) ( I found measuring from the center to the edge and reaching 5.5 inches was easier - it can be tough to smooth the knitted fabric enough to measure)
Work even for 6 rows.
Start decreases, by alternating the decrease row: [knit 2 together, knit to marker] repeat to end of round... with a plain knit row.
Continue to decrease every other row until 3 inches of decrease have been worked.

Removing all markers except the end of row one, [K2, p2] across row (increase or decrease at end of row if stitches do not divide by 4) and continue to work 2 by 2 ribbing for 6 rows. Bind off in ribbing loosely.
Felting: Before washing, find some all acrylic yarn in your stash and measure your head size (mine was 21 inches) Cut acrylic yarn about 23 inches and using a darning needle, weave it through the ribbing about every 2 stitches, join by tying together securely so that the ribbed band is securely 21 inches around. *** this is important so that the band does not stretch out of shape during felting.
Put through one full hot - regular wash, (it's good to throw a couple of old towels in with the hat - but put the hat in a mesh delicates bag). If not shrunk enough to fit, try one more round in the wash. Hand shape and allow to dry then carefully pick out the acrylic yarn stay.

Wednesday, October 20, 2010

Circle Shawl

My friend Susan asked me to write a pattern for some cunky hand dyed boucle yarn that she had in her stash for years. She wanted a shawl that was essentially a circle with a straight opening down one radius for the neck, and to allow the ends of the circle to hang open or be thrown over a shoulder. This is the first time I have designed a pattern without knitting it myself... Susan did a great job with the pattern! Here is the pattern...


Circle Shawl...
This is knit from lower back edge, in garter stitch, on large circular needles (not joined)
Yarn: bulky weight yarn.
Gauge: 5 Sts = 4 inches on 15 mm needles....
Cast on 13 sts. Knit every row (garter stitch)
Cast on 3 stitches at the start of next 6 rows. (31sts)
Cast on 2 sts at start of next 8 rows (47 sts)
Cast on 1 stitch at start of next 16 rows (63 sts)
Increase 1 stitch AT EACH END on next row and every 4th row, 4 times total (71)
Increase 1 stitch at each end on 6th row, and 12th row. (75 sts are on the needle now)
Work even for 5 inches. (middle of the circle!)
Work 34 stitches, cast off center 7 stitches , join another ball, and knit remaining 34 stitches.
Work both sides at the same time from different balls, work 5 inches more even.
Begin decreasing: Knit 2 together at outside edges only **center neck opening does not get any decreases!!** of next row and 6th row after that. (32 sts on each side)
Decrease 1 stitch at each outside end every 4th row 4 times (28 sts)
Decrease 1stitch at each outside end every other row 8 times (20 on each side)
Cast off 2 stitches at start of outside edges until 4 are decreased from EACH outside edge (16 sts on each side)
Cast off 3 stitches at the start of outside edges until 3 are removed from EACH outside edge and 7 stitches remain on each side.
Cast off 7 stitches from the start of next 2 rows. (all gone)
Add fringe to outside of circle if you want.

Tuesday, September 28, 2010

Noro Chunky Silk Garden Coat

The yarn was the inspiration. Noro Silk Garden is the softest yarn with the most interesting colours, and I found such a great deal on the Chunky version at the Needle Emporium this year, I could not resist... I have loved the idea of an oversized lapel that folds on itself in waves and designed this coat to do just that. Using the seed stitch allows it to look the same whether right side is facing or wrong side as it folds back and forth. It also leaves a nice flat finish to the edge. No need to add a ribbed edging to finish the garment! You could use a shawl pinto close this in many ways, but mostly I like it just open and free flowing.


The unusual shoulder shaping on the front is intentionally designed to add to the drape of the lapel.  It creates more folds in the way the front hangs.  See the drawing for details.

Chunky Silk Garden Coat

Size:  xSmall[Small, Medium, Large, xLarge]  actual size of oversize coat: 32”[36”, 40”, 44”, 46”] measured at bustline.
Yarn:  Noro Silk Garden Chunky: 13[15, 16, 17, 19] balls, Shown in colour 6 (45% silk, 45% kid mohair, 10% wool. 50 gram balls- 60 meters)
Needles, 6mm (US 10)  Preferably circular but knit without joining in circle.  It makes it easier to knit the collar.  *** or size to achieve exact gauge AFTER knitting a swatch and washing in gentle cold water.  Lie flat to dry then measure.
Gauge: 11 sts = 4 inches. (knit in stocking stitch)
Stitch holders
Seed Stitch:  Row 1: [Knit one, purl one] repeat across the row.  Row 2: purl the knits and knit the purls.  Repeat rows 1 & 2 for the pattern.
Stocking Stitch: Row 1: knit all stitches.  Row 2, purl all the stitches.

Back:  Cast on 44[50, 55, 60, 64] stitches.  Work in seed stitch for 3 inches.  Change to stocking stitch and continue until the piece measures 13[14, 14, 15, 15] inches.
Shape armhole: Bind off 5 stitches at beginning of next 2 rows.  Decrease one stitch each side every other row 3[3, 4, 4, 4] times.  Work straight until total length is 22[23, 23, 24, 24] inches. 
Shoulder: bind off 7[9, 9, 11, 13] stitches at the start of next 2 rows.  Place remaining 14[16, 19, 20, 20] stitches on a stitch holder.

Right front: Cast on 36[38, 41, 41, 44] stitches.  Work in seed stitch for 3 inches.  Next row (right side facing) work 12 stitches in seed stitch, place marker, work the rest in stocking stitch. Continue to work the front center edge with 12 seed stitch, and the rest in stocking stitch AND AT THE SAME TIME  increase one stitch every 2 inches at the center front edge only.  Incorporate that stitch into the 12 seed stitch pattern and move the stitch marker over, converting the 13th stitch into stocking stitch as you do.  Make 6 increases like this then continue evenly for the rest of the front.  (still keeping the 12 seed stitch edge)
Work like this until the piece is 13[14, 14, 15, 15] inches long from start. 
Armhole:  Bind off 5 stitches at start of wrong side.  Bind off one stitch at armhole edge 2 times more.  CONTINUE TO WORK THE 12 STITCH SEED STITCH BAND.  Work even until 4 inches from the start of armhole decreases.  Begin increases: cast on one stitch at start of armhole edge, every other row until 9 increases have been made.  Work one row until wrong side is facing you (starting at armhole edge.)  Make shoulder extension:  Purl across 16[17, 18, 19, 20] stitches .  Place rest of stitches on a stitch holder.  Right side facing: Knit 2 together,  knit to last 2 stitches, knit 2 together.  Next row purl.  Continue to knit 2 together at start and end of each right side row until one stitch is remaining and fasten off.  (see drawing – you are making the triangular shoulder extension)
Work left side:
 Cast on 36[38, 41, 41, 44] stitches.  Work in seed stitch for 3 inches.  Next row (right side facing) work 24[26,29,29,32]sts in stocking stitch, place marker, work the rest in seed stitch. Continue to work the front center edge with 12 seed stitch, and the rest in stocking stitch AND AT THE SAME TIME  increase one stitch every 2 inches at the center front edge only (the seed stitch edge).  Incorporate that stitch into the 12 seed stitch pattern and move the stitch marker over, converting the 13th stitch into stocking stitch as you do.  Make 6 increases like this then continue evenly for the rest of the front.  (still keeping the 12 seed stitch edge)
Work like this until the piece is 13[14, 14, 15, 15] inches long from start. 
Armhole:  Bind off 5 stitches at start of right side.  Bind off one stitch at armhole edge 2 times more.  CONTINUE TO MAINTAIN THE 12 STITCH SEED STITCH BAND AT THE CENTER FRONT.  Work even until 4 inches from the start of armhole decreases.  Begin increases: cast on one stitch at start of armhole edge, every other row until 9 increases have been made.  Work one row until right side is facing you (starting at armhole edge.)  Make shoulder extension:  Knit across 16[17, 18, 19, 20] stitches .  Place rest of stitches on a stitch holder.  Purl one row.  Right side facing: Knit 2 together,  knit to last 2 stitches, knit 2 together.  Next row purl.  Continue to knit 2 together at start and end of each right side row until one stitch is remaining and fasten off.  (see drawing – you are making the triangular shoulder extension)

Sew shoulder seams (drawing : match A to A and B to B and sew in between)
With circular needle, pick up the stitches from right front holder, pick up 8[9,9,10,10]sts  from right shoulder extension, sts from back holder, 8[9,9,10,10]  sts from left front shoulder extension, then sts from left front holder.
Work seed stitch across the collar, back and forth until 2.5 inches are worked, then cast off all stitches in seed stitch.

Sleeves: (make two) Cast on 26[28,30,30,32] stitches, Work in seed stitch for 3  inches.
Work in stocking stitch, increasing one each side, every 6 rows 10 times.   Continue without increasing until total length is 15 inches (or whatever length you would like). 
Cap shaping: Bind off 5 stitches at start of each row.  Decrease one each side every other row 8 times, then one each side EVERY row 3[3,4,4,4] times.  Bind off 2 stitches at the start of next 4 rows, then bind off all remaining stitches.
Sew cap of sleeve into armhole curve of front/back.
Sew sleeve and side seams.  I like to wash gently in cold water and lay flat to dry... this softens the garment and gives a nice halo to the fabric.  This also makes it a little more relaxed and bigger, so keep it in mind for sizing.  The coat I made has long enough sleeves to roll up.  You could make the sleeves shorter if you don't want the rolled cuff.


If you tuck one lapel under opposite shoulder, you get this different look!

Sunday, August 29, 2010

Lace and Mo Shawl

I had in my stash a lovely ball of very fine hand dyed lace-weight, and a matching ball of chunky mohair. The lace-weight should be knit on 3mm needles and the chunky on 6mm.... how to combine for one article of fabulousness?

The result is a large needle knit, really lacey fabric with single rows of fuzzy chunky at regular intervals to stabalize the whole thing!

Yarn: 100 grams of lace weight yarn, and 50 grams of chunky mohair (any thin yarn and thick yarn from your stash should work for this. You could even use several smaller balls and stripe it as you go)

Needles: 6mm (US 10) *** you must use circular needles here to follow the one row stripe pattern.... you will see how you must slide the yarn over to start on the same side again****

Shawl: With lace weight yarn, cast on 60 stitches.

Lace pattern: With lace weight yarn: Row 1, 2, and 3, Knit every row.
Row 4: Knit one, [yarn over, knit one] repeat across the row to end.
Row 5: knit all the stitches and drop all the yarn overs.
Row 6, and 7, knit all stitches.
Row 8: change to chunky mohair, and knit across with this yarn (leave a 5 inch tail at the start and end - breaking yarn when done this row**** DO NOT break the lace weight yarn .

Next row: slide the shawl back to the other end of the circular needle, without turning the project, so that you are now knitting with the lace weight yarn on the side you left it. Knit the lace-weight across the mohair row! This is Row 1 again. Repeat the row 1 - 8 pattern until the shawl - wrap is as long as you like.
End with row 1 - 6 of the lace-weight yarn and cast off all stitches.
Sew in the 5 inch tails of all the mohair rows.

The mohair row keeps it lying flat and stops it from bunching and curling. The lace yarn shows the yarn over row as an even more open stitch, giving it a spun web image.

Light and lacey and just right.

Friday, July 23, 2010

Alpaca Silk Easy Cardi'


Now with Multi-sizing!  I decided this would be the first of the updated patterns, since this one was the most requested.  It is truly easy... to knit and to wear.  Enjoy!


I have been looking at a bag full of Debbie Bliss Alpaca Silk DK for over a year, and could not decide whether it wanted to be scarves and hats or a garment! Finally I pictured it as a soft fitting cardigan, more drape than shape. This leads to an easy knit, and I did it on a bit bigger needle to emphasize the soft drape. The easy design includes self-finished edges (no ribbing to pick up and finish) and picked up sleeves (no shoulder seams to sew later!)
Sizes:  Small (fits bust 32 – 34 “), Medium (fits 36 – 38 “), Large (fits 40 – 42), Xlarge (fits 44 – 46)
Yarn: 9, [10, 12, 14] balls of Debbie Bliss alpaca silk dk, colour 26009 (teal) ( 50gms, 114 yards) or any DK weight that knits to GAUGE, you may need more balls if longer sleeves are the choice.
Needles: 4.5 mm (US 7)  (adjust to get GAUGE if necessary)
Stitch marker.
Gauge: 14 sts = 4 inches, and 19 rows = 4 inches.  *** please check your gauge and change the needles or the yarn choice to match the gauge.  This will insure the size you want!!

Stitch patterns: Seed stitch: Row 1: [knit1, purl 1] repeat across.  Row 2: knit the purls, purl the knits!  Repeat these two rows.
Stocking Stitch: Row 1: knit across all stitches. Row 2 purl across all stitches.
For multi sizing, the first number will be small the rest in the [brackets] like this:  small[medium,large,xlarge]

Back: Cast on 56[63,70,77] stitches, Work in seed stitch for 12[12,14,14] rows. Change to stocking stitch. Work in stocking stitch for 11[12,13,14] inches (above seed band). Cast off 4 stitches at start of next two rows (armhole placement). Continue in stocking stitch until 10[10,10.5,11] inches above armhole decrease.
Cast off 12[14,16,18] stitches at start of next 2 rows. (24[27,30,33] stitches left). Work 6 rows of seed stitch on these remaining stitches for back of neck. Cast off all remaining stitches.

Front Right: Cast on 46[50,54,58] stitches. Work seed stitch for 12[12,14,14] rows. Next row: work seed stitch for 10[10,12,12] stitches, place marker, work stocking stitch for the rest of the row. Continue to work a seed stitch band on the right edge (inside marker) and stocking stitch on the rest for 11[12,13,14] inches above the lower seed stitch band. Cast off 4 stitches from the LEFT side of the piece (at the start of the wrong side of knitting).  Work until the piece is length to the shoulder of the back piece. Next row (right side facing you):  Work in seed stitch across to the last 12[14, 16, 18] shoulder stitches. Cast off these 12[14,16,18] sts (shoulder). With wrong side facing (next row) join yarn again and work the last 6 rows in seed stitch for all remaining stitches. Cast off all stitches.

Left Front; Cast on 46[50,54,58] stitches. Work seed stitch for 12[12,14,14] rows. Next row: work stocking stitch until last 10[10,12,12] stitches, place marker, work seed stitch for the rest of the row. Continue to work a seed stitch band on the left edge (inside marker) and stocking stitch on the rest for 11[12,13,14] inches above the lower seed stitch band. Cast off 4 stitches from the RIGHT side of the piece (at the start of the right side of knitting). Work until the piece is length to the shoulder of the back piece.
Cast off first 12[14,16,18] sts (shoulder) then work the last 6 rows in seed stitch for all remaining stitches. Cast off all stitches.
Shoulder: Stitch the shoulder stitches together on the fronts to the back, and stitch the short seed stitch back piece to the short seed edge on the front piece (bit of a collar - only an inch seam).

Sleeves:
With right side facing you pick up 68[68, 70, 72] stitches along the armhole.  Knitting down the sleeve, use stocking stitch and off you go. Decrease one each side of the sleeve, every 6 rows until the length you want - mine is 14 inches for a 3/4 length sleeve. Finish with 6 rows of seed stitch, and cast off. Repeat for the other sleeve.
Sew side and sleeve seams.


*****update January 2015****** Michelle sent me her photo of the finished Cardigan!  Lovely