 The yarn was the inspiration. Noro Silk Garden is the softest yarn with the most interesting colours, and I found such a great deal on the Chunky version at the Needle Emporium this year, I could not resist... I have loved the idea of an oversized lapel that folds on itself in waves and designed this coat to do just that. Using the seed stitch allows it to look the same whether right side is facing or wrong side as it folds back and forth. It also leaves a nice flat finish to the edge. No need to add a ribbed edging to finish the garment! You could use a shawl pinto close this in many ways, but mostly I like it just open and free flowing.
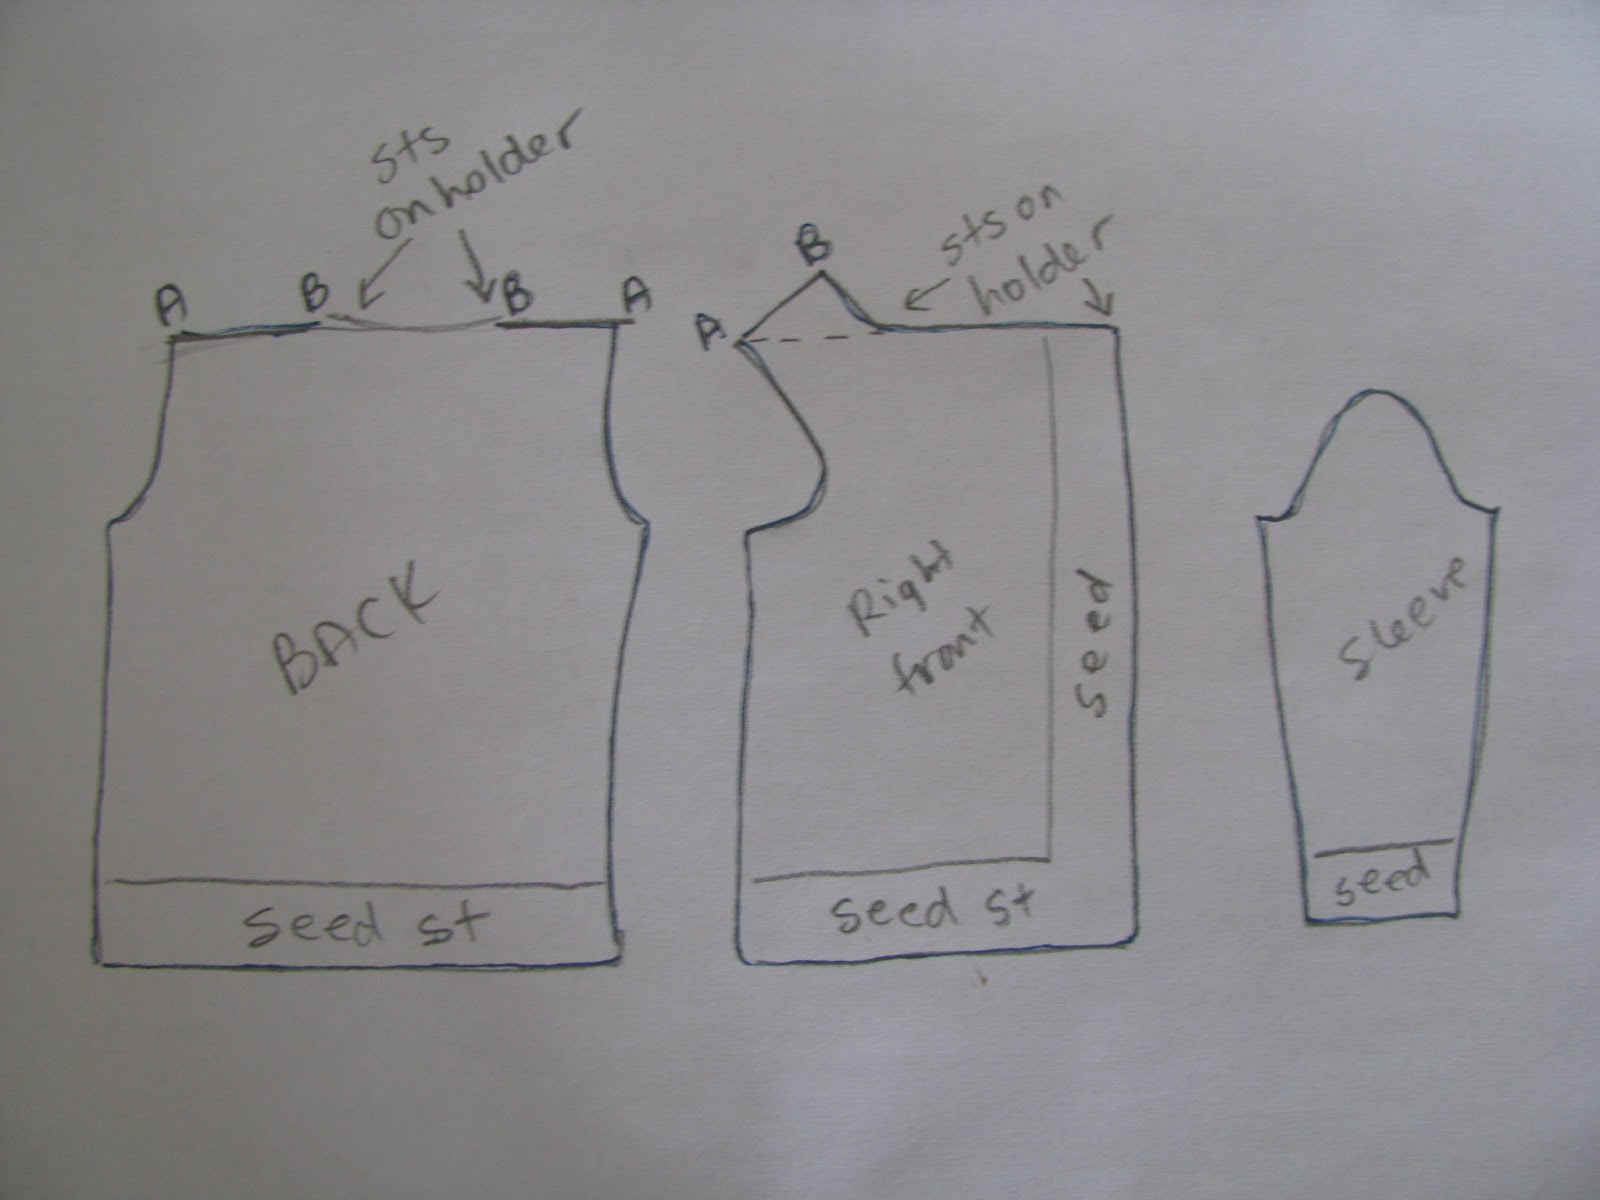
The unusual shoulder shaping on the front is intentionally designed to
add to the drape of the lapel. It
creates more folds in the way the front hangs.
See the drawing for details.
Chunky Silk Garden Coat
Size: xSmall[Small, Medium, Large, xLarge] actual size of oversize coat: 32”[36”, 40”, 44”, 46”] measured at bustline.
Yarn: Noro Silk Garden Chunky: 13[15, 16, 17, 19] balls, Shown in colour 6 (45% silk, 45% kid mohair, 10% wool. 50 gram balls- 60 meters)
Needles, 6mm (US 10) Preferably circular but knit without joining in circle. It makes it easier to knit the collar. *** or size to achieve exact gauge AFTER knitting a swatch and washing in gentle cold water. Lie flat to dry then measure.
Gauge: 11 sts = 4 inches. (knit in stocking stitch)
Stitch holders
Stitch holders
Seed Stitch: Row 1: [Knit one, purl one] repeat across the
row. Row 2: purl the knits and knit the purls. Repeat rows 1 &
2 for the pattern.
Stocking Stitch: Row 1: knit all stitches. Row 2, purl all the
stitches.
Back: Cast on 44[50, 55, 60, 64] stitches. Work in seed stitch for 3 inches. Change to stocking stitch and continue until the piece measures 13[14, 14, 15, 15] inches.
Shape armhole: Bind off 5 stitches at beginning of next 2 rows. Decrease one stitch each side every other row 3[3, 4, 4, 4] times. Work straight until total length is 22[23, 23, 24, 24] inches.
Shoulder: bind off 7[9, 9, 11, 13] stitches at the start of next 2 rows. Place remaining 14[16, 19, 20, 20] stitches on a stitch holder.
Right front: Cast on 36[38, 41, 41, 44] stitches. Work in seed
stitch for 3 inches. Next row (right side facing) work 12 stitches in
seed stitch, place marker, work the rest in stocking stitch. Continue to work
the front center edge with 12 seed stitch, and the rest in stocking stitch AND
AT THE SAME TIME increase one stitch every 2 inches at the center front
edge only. Incorporate that stitch into the 12 seed stitch pattern and
move the stitch marker over, converting the 13th stitch into stocking stitch as
you do. Make 6 increases like this then continue evenly for the rest of
the front. (still keeping the 12 seed stitch edge)
Work like this until the piece is 13[14, 14, 15, 15] inches long from start.
Armhole: Bind off 5 stitches at start of wrong side. Bind off one stitch at armhole edge 2 times more. CONTINUE TO WORK THE 12 STITCH SEED STITCH BAND. Work even until 4 inches from the start of armhole decreases. Begin increases: cast on one stitch at start of armhole edge, every other row until 9 increases have been made. Work one row until wrong side is facing you (starting at armhole edge.) Make shoulder extension: Purl across 16[17, 18, 19, 20] stitches . Place rest of stitches on a stitch holder. Right side facing: Knit 2 together, knit to last 2 stitches, knit 2 together. Next row purl. Continue to knit 2 together at start and end of each right side row until one stitch is remaining and fasten off. (see drawing – you are making the triangular shoulder extension)
Work left side:
Cast on 36[38, 41, 41, 44] stitches. Work in seed stitch for 3
inches. Next row (right side facing) work 24[26,29,29,32]sts in stocking
stitch, place marker, work the rest in seed stitch. Continue to work the front
center edge with 12 seed stitch, and the rest in stocking stitch AND AT THE
SAME TIME increase one stitch every 2 inches at the center front edge
only (the seed stitch edge). Incorporate that stitch into the 12 seed
stitch pattern and move the stitch marker over, converting the 13th stitch into
stocking stitch as you do. Make 6 increases like this then continue
evenly for the rest of the front. (still keeping the 12 seed stitch edge)
Work like this until the piece is 13[14, 14, 15, 15] inches long from start.
Armhole: Bind off 5 stitches at start of right side. Bind off one stitch at armhole edge 2 times more. CONTINUE TO MAINTAIN THE 12 STITCH SEED STITCH BAND AT THE CENTER FRONT. Work even until 4 inches from the start of armhole decreases. Begin increases: cast on one stitch at start of armhole edge, every other row until 9 increases have been made. Work one row until right side is facing you (starting at armhole edge.) Make shoulder extension: Knit across 16[17, 18, 19, 20] stitches . Place rest of stitches on a stitch holder. Purl one row. Right side facing: Knit 2 together, knit to last 2 stitches, knit 2 together. Next row purl. Continue to knit 2 together at start and end of each right side row until one stitch is remaining and fasten off. (see drawing – you are making the triangular shoulder extension)
Sew shoulder seams (drawing : match A to A and B to B and sew in between)
With circular needle, pick up the stitches from right front holder, pick up 8[9,9,10,10]sts from right shoulder extension, sts from back holder, 8[9,9,10,10] sts from left front shoulder extension, then sts from left front holder.
Work seed stitch across the collar, back and forth until 2.5 inches are worked, then cast off all stitches in seed stitch.
Sleeves: (make two) Cast on 26[28,30,30,32] stitches, Work in seed stitch for 3 inches.
Work in stocking stitch, increasing one each side, every 6 rows 10 times. Continue without increasing until total length is 15 inches (or whatever length you would like).
Cap shaping: Bind off 5 stitches at start of each row. Decrease one each side every other row 8 times, then one each side EVERY row 3[3,4,4,4] times. Bind off 2 stitches at the start of next 4 rows, then bind off all remaining stitches.
Sew cap of sleeve into armhole curve of front/back.
Sew sleeve and side seams. I like to wash gently in cold water and lay flat to dry... this softens the garment and gives a nice halo to the fabric. This also makes it a little more relaxed and bigger, so keep it in mind for sizing. The coat I made has long enough sleeves to roll up. You could make the sleeves shorter if you don't want the rolled cuff.


36 comments:
thanks for this
seeing you wearing it is the inspiration I needed to start knitting seriously again
Kathleen
thank you for this
it is beautiful
Kathleen
fabulous
Can you tell me the gauge in this pattern? I am thinking of using Zanziba instead of the Noro.
Thanks for the question, I have added a gauge to the pattern above, 14sts and 17 rows = 4 inches, and I think Zanziba on 6mm needles should be close!
Happy knitting!
so wish this was in size 60" chest its so beautiful and looks so relaxing and comfy :) love it
hi Chrissy, could I use stocking stitch all the way? I've only knitted a scarf so far but I really want to do this and think I could have a crack at it if I could! Well done; a lovely look.
stocking stitch would be a problem, as the edges would roll up and not drape properly. Garter stitch is easy, knit each row! Give it a try.
Aha knit I can do! Thanks ever so much for putting this on. Have just ordered the yarn, can't wait.
one more thing - do you really mean 16 balls?
16 balls of 50gram chunky yarn, yes. It is a large coat!!
thanks for your time, TTFN
How would I change this for Xsmall/Small? I have only knitted 2 sweaters and that was 45 years ago!!!!
for small.... start the back with 53 stitches, and the fronts with 37 each. Sleeves could be 27. Follow rest of pattern, but make it a couple of inches shorter in length for all pieces. It should work out fine!
Thanks for the small dimensions! This is now next in my queue.
Gorgeous Sweater! Exactly what I need. Thank you so much for sharing the pattern with us. It looks fantastic on you.
If making this great jacket in size small, how many yards would you estimate I would need?
about 950 for medium ,... so maybe 850 for small? Not sure.
Chris
Love your pattern. Thanks for sharing. I'm considering adding to the length. would I just add the extra inches in the area before binging off for sleeve area?
I'd like to makebthisbin an 18/20 for my mom. How can I enlarge without losing the proper shape?
If you can find a yarn that knits to 12 sts to 4inches, bulky yarn or 7mm. Needles, it should work big enough just following the pattern.
beautiful jacket - just what my daughter has asked me to make BUT I don't knit - only crochet - any diagram with measurements so I could have a go at making my own pattern?
thank you
Linda
I just finished this garden coat and love love it. Now i have lots of family and friends that want one. :) perfect for cool nights. Thank you for sharing.
I love this coat but I can't seem to get the gage right and I'm trying to figure out what size to do. I am wanting to use ella rae Seasons yarn but I'm not sure its bulky enough as my gage is coming out to 14 stitches on size 11 needles. I have to go up to size 15 needles to get the 11 stitchs per 4". My bust measures 42". Help!!! can the pattern be adjusted to use this yarn?
You need to get a truly chunky yarn, that knits to gauge, then make the largest size. Should fit fine!
Chris
I made this pattern just from looking at someone else's clothing. I am going to make it again according to your pattern. Thanks.
Did you know this yarn was discontinued in 2008?
Sad that they discontinued such a wonderful yarn. Still, probably why I purchased it at such an amazing price in 2009, and made this back in 2010. There must be other self striping chunky yarns that would produce this pattern....
Happy yarn hunting!
This is so beautiful and I can't wait to make it! Thank you so much for sharing!!!
This is just so beautiful and thanks for sharing! I Dont have a LYS in my area, just a Joanns fabric or Hobby Lobby. Can any bulky yarn work? Like a 6 weight? And would I use the same size needles your pattern calls for?
I am a big fan in substitution. In fact I think the Noro Chunky is no longer available anyway. So, look for chunky yarns, and definately knit a swatch and wash it, and measure the gauge. If it is right, go ahead, if it is close, try larger or smaller needles to get it exact!
A little bit of work up front, save hours of ripping and re-knitting later!
Chris
Hi. I was hoping to knit this wonderful jacket in Rico creative galaxy chunky. The gauge looks like it would be fine but I'm not sure how many 50g balls to buy. I don't want to run out! Can you help at all? Many thanks and happy Christmas, Kath
In my coat I used 15 balls at 60 meters a ball for 900 meters. Not sure the Meters in Rico yarn
Hope that helps
Chris
Hi. Could this be knitted in super bulky? Thanks
Success with any pattern is determined by meeting the gauge. If your bulky yarn knits to 11 sts = 4 inches in stocking stitch, it will work. If you get, say, 8 stitches to 4 inches, and knit this pattern you will have a sweater that is 30% larger everywhere. I doubt it would fit anyone. So the answer is probably not.
Hope that helps.
Chris
I love your diagrams! Thank you for including them. My pet peeve with most American patterns is that there are no diagrams. And, your diagrams show that you do "pencil them out." Cheers to you and your designs!
Post a Comment